Thursday 15 December 2016

Heat embossed jhumka variant- ICR Bloghop!!!

Heya folks!!!

This year has been great fun as I had the chance to be the Design team member for ICR. The opportunity that was given to me has increased my range in crafting and my knowledge about the same!!!
This year I have tried many new techniques owing to the challenges in ICR. I thank them for considering and recalling the previous DT's to end up this year with a bloghop!!!


Indian Craft Room Past and Present DTs gonna join in for a ICR Blog-hop. Don't forget to hop along, play along the challenge. 

Theme : Emboss Me Anything WET or DRY!


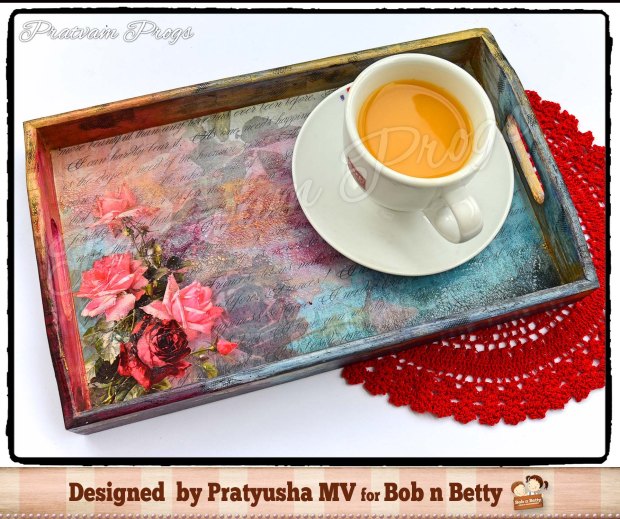
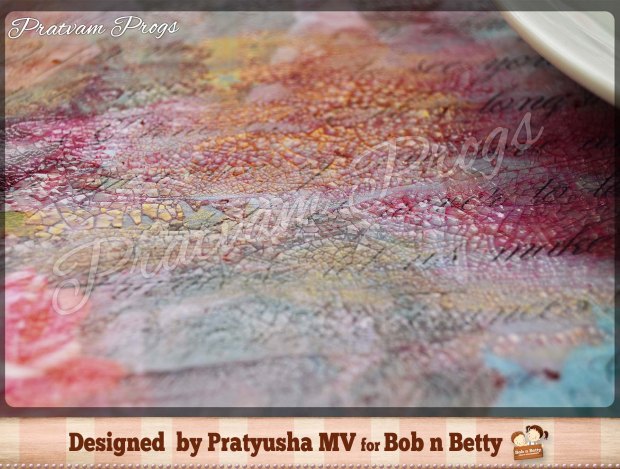
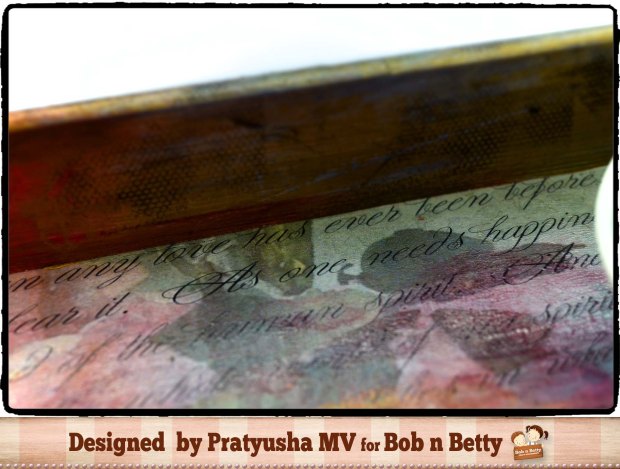
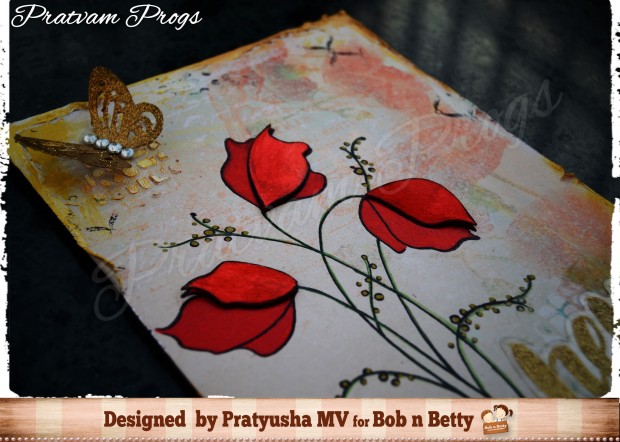
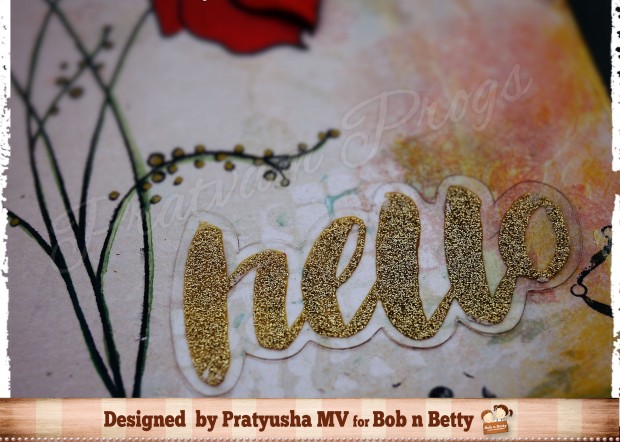
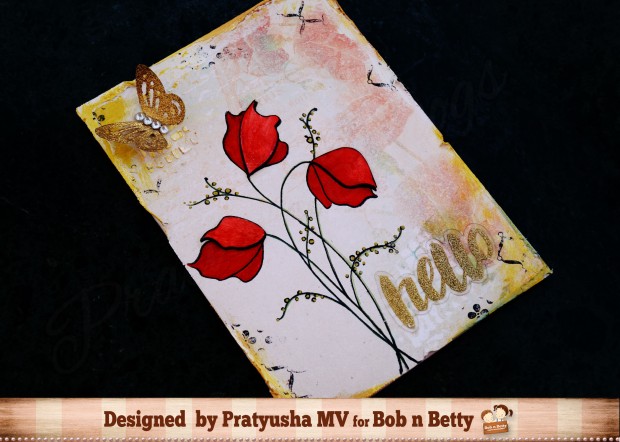
Here is my creation with embossing .

I created a Quilled jhumka-heat embossed variant!!!
 I used one of the floral outline stamps from Linen bloom stamp set which is from mudra stamps. 
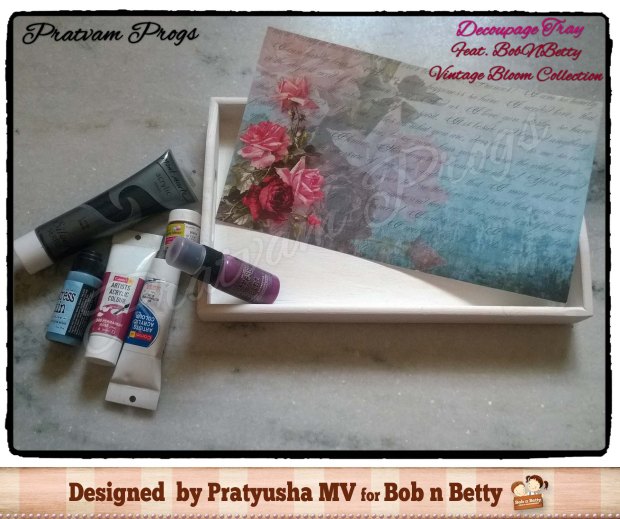

 Materials used-
Quilling strips, Gesso, decoupage Gloss glue and earring findings from itsy bitsy!!!
Versamark embossing inkpad and Black embossing powder from thecraftshop.in !!!
Linen bloom stampset from Mudra stamps!!!
                                                            acrylic colours from my stash!!

Hope you liked the creation and got inspired to play along :) 

Come and join our Crafty year end Blog-hop party

Here is the hop list and you can click on the images to go to their respective blogs.


Our Sponsor this time is Nagashri arts and there is an awesome bag of goodies to grab as prize!!!


Lots of love,
Pratyusha!!!

Monday 14 November 2016

Specialty decoupage paper by Bobnbetty for Decoupage jhumkas!!!


Hey friends,
Pratyusha here with another tutorial on how to use Bob n Betty Decoupage Specialty Papers on quilled jewellery. …
Do share your feedback🙂
Much Love..
Pratyusha

Wednesday 2 November 2016

FAQ series: Quilled Decoupage Jhumkas!!!


FAQ- You keep mentioning about Gesso, as the coat you apply on the dome. Is gesso the secret to get smooth domes. 
A- It all starts from the main base- which is the dome.. if the dome is not perfect enough, then how much ever u try, the outcome will not be perfect. Gesso is nothing but white acrylic paint but only thicker and stronger. I use gesso coz they increase the strength of the base and the other reason being, I don't have white quilling strips and don't want to invest into buying more strips coz I have 2huge boxes of coloured quilling strips laying around...

FAQ SERIES: Question by Aishwarya Natarajan on FB page-Do u use gesso only for decoupaging or even for painting the jhumka? Do u insert the head pin before applying gesso? Coz otherwise it becomes hard to poke a hole, no?
Can I use modpodge gloss instead of decoupage gloss glue? If I use colored strips, which I don't wanna paint on, just mod podge gloss will give the same effect of glossiness And finish?
Question by Swetha on FB: How many coats of decoupage glue we have to apply??
Question by Sukriti on FB: how long do you let ur jhumkas dry after applying gloss glue..
A- If I don't have the exact colour of quilling strips required for a plain jhumka then I use gesso and then use acrylic paint to get the colour I want. Gesso basically masks the colour of the strips underneath.
When to insert the headpin is a tricky one as it changes with each variant that I do according to the process I follow. It's up to you when u want to insert the headpin into the jhumka. In the tutorial(blue flower) I had done it after I was finished with pasting the cutouts on the dome. It could have been done before pasting the cutouts as well so that u can hold the headpin while pasting the cutouts. For the green one in the pic I would recommend inserting the later as it will allow u to paste the cutout properly without the pin hindering. Poking a hole into the jhumka can be done using the needle tool. It's not difficult at all.
I am biased towards the decoupage gloss glue coz of the consistency of the glue and the finish it gives me. I feel that mod podge has a thicker consistency than the decoupage gloss glue by Itsy bitsy!!! This again is a personal preference. For sure the mod podge gloss also will give u a similar finish though. Tip: mix(very) little water into the mod podge to change its consistency if mod podge is all you have.
I personally apply 3- 4 coats of decoupage gloss glue with an interval of 20 mins between each coat for drying.
After the final coat of decoupage gloss glue I leave the jhumka atleast overnight or a day, before I touch it or take it to the next process of adding in the embellishments like beads or findings. 


FAQ: Can gesso be substituted???/Can we use acrylic paints instead of gesso??? How many coats of gesso/ acrylic paint do you apply??Where to buy gesso from?? 
A- As mentioned previously I use gesso to impart strength to the jhumka and to make my coloured jhumka dome/ base white coz I don't own white quilling strips. Yes, gesso can be substituted with acrylic paint that u own. If like me u r using coloured strips to make your dome then you can use white acrylic paint, if you are using white quilling strips itself then you can use any coloured acrylic paints too. Atleast 2-3 coats of gesso/ acrylic paint has be applied with a short break for drying in between these coats. Gesso can be bought in a physical store that deals with art and craft supplies like @itsybitsycraftstore or @multistationary stores. If not it can be bought online @itsybitsycraftstore, @amazon.in_india, @skillsupplies.com@himalayafineart.com or any art and craft store online 


FAQ: What do you use to waterproof? How long does it take to make one pair of jhumka!! Is it required to have a white base while using tissue to decoupage!!! Where do you get your patterns from?? Which printer do u have to print on tissues??
A- for normal quilled jewelry I use decoupage gloss glue itself!! For beaded ones I use the decoupage Matt glue followed by 2 coats of Asian paints wood varnish!!
With all the processes that I follow, I takes minimum 2-3 days to finish one pair including all the wait for stuff to dry properly!! If u r using a tissue I would suggest you have a white background as the colours of the tissue get a uplift when placed on a white background!! If you are using pattern paper this won't be a issue, u van color the background any colour you want and then stick the pattern!!
I get the patterns from Pinterest!!
I own a HP 3in 1 inkjet printer and that's what I use for printing on tissues!!


Will keep updating this!!!

In case this helps you, do give me a shout out!!! 

Tuesday 4 October 2016

A DECOUPAGED TRAY MADE FROM VINTAGE BLOOMS PAPER COLLECTION

Hello Fellas…
Pratyusha here with a new blog post, Hope you all are enjoying the festive season.
Well as the festivities are absolutely on my mind, I decided to create something peppy for this month’s blog post. No Doubts, a lot of guests come over home during this time of the year, so the idea of making a bright and colorful serving tray blown my mind. So, I picked up my all time favorite Vintage Blooms of Bob n Betty and there you go……
pmv001
Here is the procedure I followed:
  1. Select a pattern paper you like from. Cut it to fit the tray you choose.
  2. Apply gesso onto the tray surface and let dry between coats. Give at least 2 coats of gesso.
pmv002
3. Apply a layer of Decoupage glue over the tray surface and stick the cut pattern paper in place and let dry.
4. Select paints that go with your pattern paper and paint the tray accordingly. I used acrylic paints and Tim Holtz distress paints to get the vintage effect. Let it dry.
5 Once dried, I used Tim Holtz script stamp and Stazon black ink to randomly stamp all over the tray.
6. Used one-step crackle paint from Tim Holtz over the pattern paper and let dry till the cracks were formed.
pmv003
7. Gave highlights with Viva Decor Inka gold- Gold paint.
pmv004
8. To finish and seal the project I used Asian Paints wood varnish!!!
pmv005
pmv006
Hope I’ve been able to inspire you to create something for your home.
Cheers…
Pratyusha

Saturday 13 August 2016

A CUSHION COVER MADE WITH IMAGE TRANSFER TECHNIQUES – DECOUPAGE SPECIALTY PAPERS

Hello Friends,
Pratyusha here with yet another project with Bob n Betty Decoupage Specialty papers.
Well, I got bored of using the papers same way!!! So I decided to give a trial run at using the gorgeous decoupage specialty papers for home décor purposes. Thus I came up with the idea of using it to make a cushion cover that could be utilized on day to day basis!!!
I am totally stoked by the gorgeous patterns that are being released in this Decoupage specialty papers series.
So here’s what I created!!!
PMV001
PMV003
Yup the trial did work out just perfect. Now this belongs to my mum as she is denying removing the cover and has been using it in our living room and flaunting it in front of everyone visiting our home. J
A little walkthrough about the procedure followed!!!
Like I did in my previous post where I transferred image onto a canvas cloth, this time I transferred the image onto a soft cloth following the same procedure stated before.
PMV002
After the transfer Is done onto the cloth. Cut out the cloth so that you get just the pattern out.
Next select a fabric that matches the color of the image transferred cloth and get down to the sewing machine to get the image transferred cloth attached to the fabric.
As you know that I have basic sewing skills so I took help from my mum to make the cushion cover. This is a simple envelope cover for which tutorials are freely available online!!
And this is how the charming cushion is adding spark to my living room.
PMV004
Hope you all like the project🙂
Hugs..
Pratyusha

Thursday 11 August 2016

DECOUPAGED COASTERS ADORNED WITH FLORAL NYMPHS PAPER COLLECTION

Hello Folks,
Have you ever thought of giving a creative bend to your table placed at home? Why not add some fun element to your home by incorporating a décor scheme to your table? This idea enthralled me and I decided to use it in my project and ended up making the decoupage coasters to beautify the table appearance in my own creative way. The project reflects coasters which can be used as an exclusive home décor item.
PV001
For giving the perfect shape to the coaster, I used the gorgeous pattern papers collection of Bob n Betty, Floral Nymphs. The papers are beautiful amalgamation of vintage and vibrant flowers. It was the best choice for my project. There are so many elements which can be used giving a different dimension to the coaster.
PV002
The base is of MDF, which was coated with gesso. The pattern papers were cut into the shape a little larger than the MDF blank. I used decoupage matt glue to stick the cut out pattern paper onto the MDF blank. Once the glue was dry I used sandpaper to smooth the edges and remove the excess of the pattern paper from the sides. The sides of the MDF blank were painted with black and yellow acrylic colors.
PV003
I used co-coordinating colors of distress inks to give it a vintage look. I then gave 2 coats of decoupage gloss glue and then gave 1 coat of Varnish to seal the creation!!!!
Hope you too liked the outcome.
With Love
Pratyusha

Friday 5 August 2016

Waterproof challenge: Just Jhumkas!!!

Heya folks,

Recently, my brother challenged me if the jhumkas that I make can withstand the test of water. So here's a video proving to him and everybody like him who have doubts regarding the water resistance of the product!!!


Click on the link below to watch the video :)
https://www.facebook.com/vamprat/videos/1071428832947631/?hc_ref=PAGES_TIMELINE


Hope your doubts are all cleared now :)


Thanks for stopping by :)

Lots of love,
Pratyusha

Monday 25 July 2016

Guest designer at Itsy Bitsy!!!

Heya guys,
Today I am gust designing at Itsy Bitsy.


This is a mixed media layout.
Step by step guide by Pratyusha:
First I coated the 12x12 inch chipboard with 2 coats of gesso.
 Used Tim Holtz damask stencil and the crafters workshop Art is stencil toadd in some texture using texture paste. I randomly stamped tim holtz scriptstamp using black stazon ink.
Then cut different laces- A white broad one, rhinestone chain and a pinklower lace to create a cluster in one side of the layout. To make the focalpoint I made a cluster using doilies and used a pattern paper which reads‘our great adventure’ from Poolside ephemera collection. The frameChipboard elements and the flowers are also added in.
The whole of the layout is then coated with watered down gesso. To bring the layout to getter I used Viva décor inka gold paints to add in highlights of gold color, violet, purple and pink.
The butterfly used here is a metal embellishment which is coated with gesso and a layer of viva décor inka gold- gold paint is added and buffed.I then used the alphabet stamps from my stash to write the names to customize the layout!!


Materials used : Gesso - http://itsybitsy.in/search/?q=gessoChipboard - http://itsybitsy.in/chipboard-shapes-ornate-round-frame-1pcDoilies - http://itsybitsy.in/search/?dir=asc&order=price&q=doily#/page/2Flowers - http://itsybitsy.in/phoebe-petals-french-carnival-6pcsChipboard for the base - http://itsybitsy.in/search/?fq%5Bcategories%5D=Chip+Board&q=chipboard
Double sided tape - http://itsybitsy.in/search/?q=double+sided+tape


Thankyou so much for stopping by :)

Lots of love
Pratyusha

Friday 3 June 2016

A FRIDGE MAGNET MADE WITH PAPERS FROM “SUMMER CHARM” COLLECTION

Heya folks,

In the conceptual art of crafting, even the home appliances seem to be a canvas for painting. This truly reflects the creative hunger of an artist who gives an innovative bend to whatever they perceive. Why not make everything around you beautiful and eye catching? A similar speculation knocked my mind when I saw my fridge standing at the corner, begging for some attention. 

The moment I received SUMMER CHARM collection from Bob n Betty in this month’s DT Kit, I made my mind to make a “Fridge Magnet”. 

The project was a bit easy to make as the pattern paper itself had a lot of minute details to be captured. The details were subtle and gave the project more depth appearing to have created multiple layers. The flower design on the paper set was appealing to the eye and reminded of Penny black flower stamp sets, thereby using the Penny black divine stamp set here.
PMV06
So here is a small walkthrough….
1) I selected the paper and cut it to fit 5X3 inch canvas.
2) Then distressed the edges of the paper, sticking it on the canvas.
3) Used thick gesso to add some texture using Tim Holtz burlap on the top aspect.
4) I stamped the penny black divine stamp first directly onto the pattern paper and secondly on white cardstock. Coloring the flowers red both on the cardstock and on the pattern paper, I cut one of the petals of the flower from the cardstock and added it to the pattern paper used double sided tape to raise it a bit on the pattern paper.
PMV01
5) I randomly used some mixed media stamps and gave a wash of watered down gesso.
PMV002
PMV03
6) Finally for the sentiment used ‘Hello’ from poolside ephemera collection.
PMV04
For final touches used Viva decor gold paste to add some highlights.
PMV05
This will now get onto my mom’s fridge where she hoards most of my creations:)
Hope you loved the creation
Happy Summers
Thanks for stopping by
Lots of love :)
Pratyusha

Wednesday 1 June 2016

Warrior queen- Post card Coasteride!!!

Hello Everyone,

Its June of the new year 2016... Whoa!
And at ICR its time for another new CoasteRide.... ICRCSUM02.... Again a fun challenge getting you to do what you have not been doing.... :D

Here is the Story Board....


http://indianstampers.ning.com/group/icrchallenges/forum/topics/icrcsum02-icr-post-card-own-sentiment

 Getting one to try their one time favorite POST CARDS... with their own hands & mind.... (y)

So here is what I made....


All inspired by the girl & thoughts to life!

So do join in the ICR Post Card Making Fun for this month's CoasteRide.... ICRCSUM02!

We have the pleasure of having The Craft Shop sponsor us again with a voucher of Rs.500 to their store... Thank You!

SO do join in on the fun at ICR this month.

Thanks for stopping by

Lots of love
Pratyusha