Friday, 31 January 2020

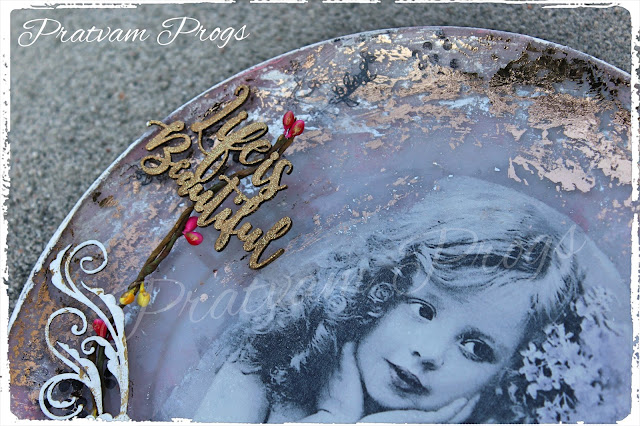
Vintage girl- decoupage glass plate.

Hey folks,

If you have read my previous blogpost then you are aware that I recently started with glass plate decoupage.

This is my 2nd attempt at glass plate decoupage and I am completely in love with the outcome. I do still wish to improve on a few points, but let's keep that for the next attempt.

So here's presenting the final outcome.


Steps followed:
1) Used acrylic medium to glue down the vintage girl napkin to the glass plate. Once completely dry, gave a sealing coat of acrylic medium.

2) Used glassy accents, sliver and golden gilding flakes on the outer corner both on the backside and the front-side of the glass plate.

3) Used Gesso, black acrylic paint, rose blush and bubble gum chalk paint to cover up the whole plate.

4) Used stamps from itsy bitsy to add more interest to the background.

5) Used jute flowers from itsy bitsy and layered it with silver, brass, gold and a crystal flower to make a bunch.

6) Finally used a gold embossed sentiment chipboard to tie everything together. Finally sealed everything with varnish.

Do share your comments. Would love to hear from you.

Submitting to Itsy bitsy January challenge- Tic Tc toe- used chipboard elements, jute flowers and stamps. 
Apart from this used- Chalk paints, gilding flakes. 

Thanks for stopping by, 

Loads of love, 
Dr. Pratyusha

Wednesday, 29 January 2020

Glass Plate decoupage- 1st trial!!!

Heya folks,

This year, I have decided I want to try my hands at different mediums that havent tried out before.

So here goes my 1st trial at glassplate decoupage.

I didnt have all the supplies but didnt want to delay playing with it.

I have learnt a lot from my mistakes while doing this project.

Here's a run through as to how I did the project:

1) Wiped the glass plate with microfiber cloth and alcohol to remove any residual fingerprints and oils.

2) Decided on a napkin pattern that I wanted to try out and separated it from its other layers.

3) Used acrylic medium to stick the napkin pattern (Here the mistake I did was my medium was a little watery so there are few wrinkles on the napkin which I couldnt remove) (Next time I will be using a thicker version of the medium to glue down the napkin to the glass plate)

4) Once the napkin was dry I gave a coat of acrylic medium again so as to seal it in place and to prevent any further seepage of the colours that I plan to use further.

5) I didnt have crackle medium at this point in time so used a thick layer of fevicol to get the cracks on the plate. ( I would have loved the final outcome more had the cracks been more aesthetic in terms of size)

6) Once the fevicol layer dried, used itsy bitsy tinted metallic paint- Twany Glint to highlight the cracks. the final layer was a combination of acrylic paints and gesso.

7) Finally used a coat of varnish to seal the completed project.

So here's what I made.


I am going to start work on my second glass plate. With all the learnings from this project surely the next one will be better, but 1st trial is always worth displaying coz it was a stepping stone.

Do leave your comments.

Thanks for stopping by,

Lots of love,
Dr. Pratyusha

Tuesday, 21 January 2020

New Beginnings- Live the moment


Heya folks,

So here's the first project for 2020. 
This project is very close to my heart since the pieces have been collected over the years and have fallen into place finally. 

The base is a refurbished wooden poster that has been in the house since I can remember and over the years of shifting was lost in packaging. The day I layed eyes on a set of these I knew I had to do something with them. ( The base thus speaking is as old as I am now.) 

So here goes a Mixed media project that is dedicated to my hero- My dad. Most of the elements in this project are a close reflection of him as a person and his personality. 

Do leave in your comments, would love to read them.

So here's the final project. 

Here are a few close up shots since there is a lot of detailing. 


Submitting to Mixed Media Academy Challenge january challenge: used yellow, grey, green colours from the mood board.

Submitting to Itsy bitsy January challenge- Tic Tc toe- used chipboard elements, Mocha colour splash for the background colour and sunrise gold fairy dust for the overall base mixed with varnish to add a glitter effect when light strikes the final project.
Apart from this used- stamps and stone texture paste from itsy bitsy

Submitting to Bleeding art challenge: Anything goes.

Thankyou for stopping by, 

Love, 
Pratyusha

Wednesday, 1 January 2020

Happy New Year 2020!!!

Heya folks,

Here's wishing everyone a very happy new year. Hope you all have a healthy, crafty and fruitful year 2020.

Welcoming the new year with the release of the Pratvam Progs Calendar 2020, done by my mother.
Here are a few pictures that capture the excitement my mother feels when she sees the calendar for the first time.


This year I am planning to remain consistent with spending more time crafting than procraftinating :P

Have planned to finish long pending projects and also take up furniture decoupage more seriously since I have a lot of bases to work with. I also have a blank wall in my home waiting to be filled up with all the craft I can create this year.
I am super excited this year. I feel this year is going to be special and magical.

Once again, Happy New year.

Thanks for stopping by,

Lots of love,
Dr. Pratyusha